Rethinking Pac-Man in Unreal Engine 5
Intro
View GitHub repo here
Chomp is an action game about navigating a maze, avoiding ghosts, and consuming all the souls (dots) to win. The game is built in Unreal Engine 5.2, and it is loosely inspired by the classic arcade game, Pac-Man.
If you have a Mac that supports Metal 2+ (and a spare moment), you can download and play the latest game build. As of this writing, the latest build is v0.19.0.zip:
View Google Drive builds
The controls:
WASD: Move Chomp (the main character) around the maze.Space: Zoom out to see the entire maze; release to return to default perspective.
What follows is a technical walkthrough of the game's development:
- Situation. Some background on why the game was developed,
- Task. Defining the user stories behind creating the game,
- Action. How each of the game's features were built, and
- Result. A discussion of the implementation's benefits, tradeoffs, and what I could have done differently.
Let's dig right in. 👇
The trial of an Unreal developer
In May 2023, I decided to learn Unreal Engine.
I researched the job market and found that the majority of game studios (for PC and console titles) worked in Unreal Engine. I had a decent amount of hobbyist Unity experience, but I decided it'd be best to retrain myself in Unreal to prepare for work in games.
Which leads to an important question. How do you learn Unreal?
And not only learn it, but also be able to demonstrate skills to a professional degree?
Saying no to tutorial hell
The common answer is to go through a Udemy course.
Some of these courses proudly proclaim their course length: "64 hours of video content, and you too can become a game developer!"
But I've always found that to be an inefficient way to learn.
- Firstly, it's easy to end up in tutorial hell. You watch all the course lessons and do all the exercises, but you don't apply a single thing you've learned to a project of your own. All that time spent learning, gone to waste because you didn't even need it.
- Secondly, you don't get hiring manager brownie points for following a tutorial. Doubly so if many people take the same course, and end up with the same project as yours.
In my opinion, the best way is to create a project of your own. To identify your own product and design requirements, and to figure out how to implement those requirements in your own way — through your own googling and research and ChatGPT-asking.
Curiosity-Driven Development, as it were.
Identifying design pillars
Any software project greatly benefits from design pillars: foundational ideas that guide a project's direction.
I wanted to train myself in Unreal to a professional game programmer's standard. Going into this project, I kept 4 design pillars in mind:
Pillar 1: Engine breadth
The project should give me an excuse to exercise most of Unreal's main gameplay systems:
- The Gameplay Framework
- The AI toolset (Behavior Trees, Navigation, EQS, AI Perception)
- The UI toolset (UMG)
- Materials
- Cameras
- Working with Blueprints
- And more
Pillar 2: Focus on production, not design
In A Playful Production Process, the author Richard Lemarchand outlines the four phases of any game project:
- Ideation, where you come up with ideas for your game, and finalize your game's idea.
- Preproduction, where your game design is uncertain, so you prototype and playtest your game design until it's finalized.
- Production, where you fully implement the game design and content, and do the bulk of development work.
- Postproduction, where you polish your work, fix bugs, and ready your work for release.
In a project that prioritizes learning and professional skills, I wanted to focus on the latter 2 stages of development: production and postproduction.
I didn't want to invent a new game design, nor significantly alter an existing one.
That said, there would be plenty of opportunity to add my own creative flair — both through my technical design choices, as well as through the game's ultimate look and feel.
Pillar 3: Get it right, then make it fast
Any professional developer must be able to complete routine development tasks with relative ease and efficiency.
Much in the way that I could rapidly implement full-stack features in the past (see my background), I should be able to do the same in Unreal Engine's development environment.
Pillar 4: 3 months
Finally, I didn't intend to work on this project for longer than 3 months (a financial quarter).
However, it's not easy to predict how long things will take when you've never done something, so I was flexible on this time constraint. Most importantly, I prioritized building muscle memory and habits for working within Unreal Engine over all else. I also adjusted my goals regularly through daily retros and self-reflection.
Partway into the project, I treated Unreal Fest as an opportunity to call an end to the project's development. So in many ways, the time constraint helped in prioritizing what I chose to learn.
Classic game design; modern game engine
So what project do I choose?
Which idea would serve as an effective learning project, yet also prove to be a worthy demonstration of my Unreal and C++ skills?
My answer was to choose a classic game design (Pac-Man), and figure out how to do all the pieces from scratch — but in a modern, Unreal environment.
I thought that the emphasis on AI in Pac-Man would give me an excuse to exercise Unreal's AI tools. And I also thought there'd be plenty of opportunity to tweak the gameplay, and do cool things with the level structure. (For example, one can imagine Pac-Man as a roguelike.)
Identifying user stories
So we want to make Pac-Man. But first, we need to define our game's requirements.
One way to do so is to define user stories. A user story is a feature described from the perspective of the player. It usually follows this format:
As X, I want to Y, so that Z.
Whereas a task in a typical todo list might only mention the work to be done:
* [ ] implement inventory system
A user story keeps the focus on the player — by additionally naming the player (the "X"), and describing their motivations (the "Z").
It's a useful thought exercise for sussing out what's important to your game, what's not, and why.
Luckily for us, our selected game idea has a rich bible of a game design document available in the Pac-Man Dossier.
We don't want to outright clone Pac-Man in a pixel-perfect fashion, but we use the original game design as inspiration. So I defined user stories for each feature that I wanted to implement, and worked off those requirements.
The table below serves as an example. Note that an "X" column is omitted because all the user stories apply to the same entity — the player:
| Feature Shorthand | I want to Y | So that I can Z |
|---|---|---|
| Level generation | Navigate a maze structure | Collect all the dots |
| Core game loop | Collect all the dots | Win the game (after which the game restarts) |
| Lose condition | Die when colliding with ghosts | Lose the game, and feel a sense of challenge |
In the rest of this post, I discuss the user stories that I identified, as well as the implementation details and tradeoffs made for each of them.
On desktop browsers, note that you can use the table of contents on the right for easy navigation.Tradeoffs in class design: C++ vs. Blueprints
As per Alex Forsythe's excellent video on the topic, game implementation in Unreal is achieved through Unreal's Gameplay Framework.
We bridge the gap between game design and game engine by extending Actors and composing Components, and populating our levels with instances of those Actors.
Writing gameplay code in Unreal requires choosing between Unreal's 2 programming languages: C++, or Blueprints. In the first 2 months of the project, I remained adamant about using C++ for all gameplay classes — thinking that real programmers wrote C++. 😂
But as I grew frustrated with C++ build times, and as I learned more about the full capabilities of Blueprints (it's a full-blown programming language, just with very non-traditional syntax), I shifted more responsibilities into Blueprint classes. I relied on Blueprints for the sheer speed of iteration, especially for visual work on UI and game feel.
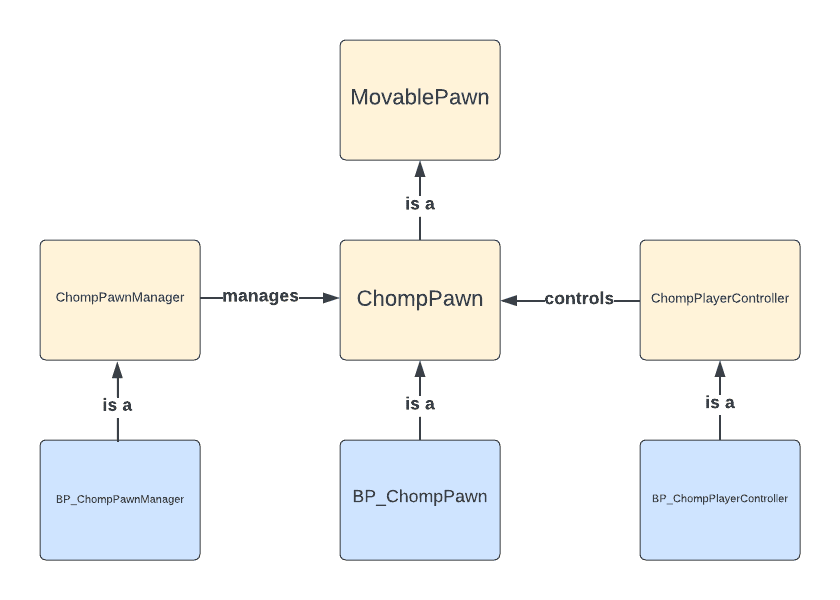
I also adopted the common pattern of pairing a C++ base class with a Blueprint child class. To take the player as an example, core logic would be written in C++ (ChompPawn), while visual iteration would be done in Blueprints (BP_ChompPawn).
With that general principle in mind, here are additional pros and cons that I weighed when choosing between C++ and Blueprints:
| Concern | C++ | Blueprints |
|---|---|---|
| Build times | ❌ Slow. Requires a rebuild from your IDE. | ✅ Instant. Zero build time. |
| Programming | ✅ Battle-tested for decades in expressing complex logic. | ❌ Turns into Blueprint spaghetti for anything complex. |
| Visual iteration | ❌ Very difficult because of build times. | ✅ The tool of choice for any visual work because of instant build times. |
| Async | 🟨 Achieable through Laura's UE5Coro plugin. | 🟨 Achievable through Timer, Delay, and Timeline nodes. |
| Version control & code review | ✅ Text-based, so very easy to review. | ❌ Saved as binary asset, so very hard to review without viewing in Unreal. |
| Collaboration | 🟨 Individual files can be worked on by multiple people. This is not always a good thing due to merge conflicts. | 🟨 Individual Blueprint classes may only be worked on by 1 person at a time. |
The core game loop
Tile-based map editing and generation
Pac-Man's infamous maze is static and unchanging. We'd like to enable that use case, while also allowing for further level customization down the line.
So first things first, I created the world for the main character (Chomp) to navigate within. Our user stories:
| Feature Shorthand | I want to Y | So that I can Z |
|---|---|---|
| Level generation | Navigate a maze structure | Collect all the dots |
| Core game loop | Collect all the dots | Win the game (after which the game restarts) |
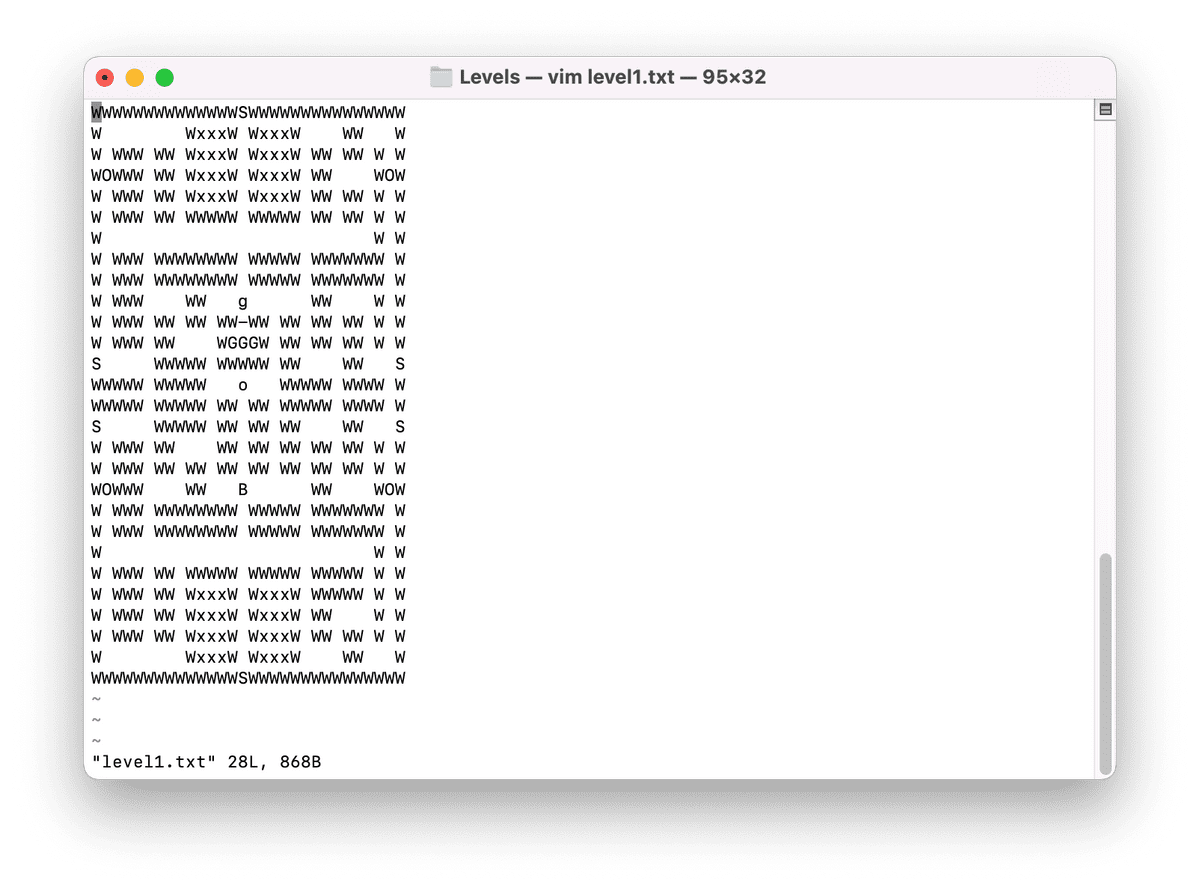
Within GameWithAI.umap, the level is generated dynamically on BeginPlay through the following process:
1. Level definition in .txt files.
The maze structure is defined in plain .txt files, where letters encode various tiles such as:
- dots
- walls
- empty tiles
- spawn points
- energizer powerups
- ghost spawn points
- wrap-around points
- bonus fruit pickups
Any modifications to the level layout simply involve editing this .txt file with a text editor.
This makes a level easy to modify, and easy to create. You would simply copy an existing level and tweak it to your heart's content. Note that levels may have an arbitrary width and height.
2. Command-line tooling with rotate90ccw.js.
The original Pac-Man game was designed for tall arcade screens, but most screens today are wider than they are tall. So for inspiration, I copied the maze layout of the original Pac-Man into a level .txt file, then used a helper Node.js script to rotate the contents of my .txt file by 90 degrees.
This workflow is obviously very programmer-centric, and not the most editor-integrated nor designer-friendly.
3. Level loading through ULevelLoader.
A class named ULevelLoader reads the contents of our .txt file, makes note of special tiles, and stores the strings in memory.
The CDO (Class Default Object) of the ULevelLoader then becomes the one place to access the currently loaded level.
4. Level generation with ALevelGenerationActor.
An instance of ALevelGenerationActor accesses the loaded level within ULevelLoader, and instantiates Actors for each respective tile. The Actors that are instantiated can be configured directly in Unreal's editor.
5. Level progression with ULevelDataAsset and ULevelSequenceDataAsset.
While not used in the current implementation (there is only 1 level), these classes support adding additional level .txt formats in the future, and ordering those levels into a level progression.
The current implementation has some drawbacks that merit discussion:
Drawbacks: Designer collaboration
The workflow for editing plain .txt files isn't designer-friendly, because there is little feedback on what letters are valid. The lone script for rotating levels must also be run via the command line.
With more time, I might explore creating EditorUtilityWidget tools to bring the level authoring workflow into Unreal. This would allow for validation of the level content, which would also explain the level format's schema.
Within a level .txt file, the origin is at the bottom left of a .txt file's contents, with the X axis pointing right and the Y axis pointing up. This requires some mental math to identify any particular FGridLocation within a level. So I'd also create a tool to easily identify (x, y) values within level files.
Drawbacks: Level generation at edit time vs. runtime
Generating tiles on BeginPlay means that we are unable to preview the level in the editor without running the game. It also leads to framerate hitches at the start of the game.
To address these issues, I would explore tooling to "bake" level formats directly into .umap files. This allows a developer to preview levels without having to run the game, and also prevents framerate hitches from having to generate levels at runtime.
Class design: grid-aligned player movement
With the level generated (dots and all), let’s discuss how the player might move around the game’s space.
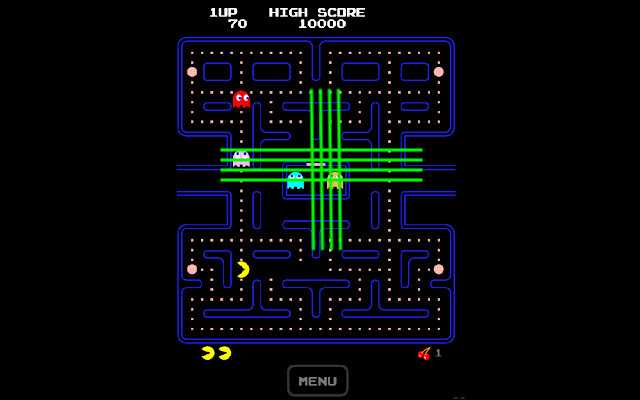
In the original Pacman (see above), Pacman moves along the grid lines of a Cartesian plane.
To implement this grid-aligned movement, we first extend Unreal’s gameplay framework:
- We define
AMovablePawn. AAPawnentity that can move within the game's space, and that can be extended for player- and non-player-controlledPawnclasses. - We also define
AChompPawn. This class represents the titular, Pacman-inspired character “Chomp”. AnAChompPawnManageralso manages the lifetime of theAChompPawn, and respawns Chomp at the appropriate time. AChompPlayerControllercontrolsAChompPawn. EveryAPawnhas aAControllerserving as the brain, and Chomp is no different. This separates the movement logic (contained withinAChompPawn) and logic for deciding when to move (contained withinAChompPlayerController).
Algorithm: movements vs. movement intentions
In the original Pac-Man game, one must input the new direction prior to reaching an intersection tile. Additionally, for the sake of allowing the player to release the input, it's important to have this new input direction stick for a brief window of time.
Thus, we distinguish between FMovementIntention (the player’s intention to move in a certain direction) and FMovement (the player’s current movement) when moving the player. At a high level, my algorithm for player movement looked like the following:
// Update intended movement first.
IntendedMovement = UpdateIntendedMovement();
check(IntendedMovement.GetDirection().IsCardinalOrZero());

// Then update location and rotation from current movement.
auto ShouldInvalidateTargetTile = false; // Some bookkeeping for deciding when to update the current movement.
if (CurrentMovement.HasValidTargetTile())
{
    const auto [NewLoc, NewRot, InvalidateTargetTile] = MovablePawn->MoveInDirection(
        CurrentMovement,
        IntendedMovement,
        DeltaTime
    );
    MovablePawn->SetActorLocationAndRotation(NewLoc, NewRot);
    ShouldInvalidateTargetTile = InvalidateTargetTile;
}

// Update current movement.
CurrentMovement = UpdateCurrentMovement(ShouldInvalidateTargetTile);
Algorithm: aligning to the grid
Note the mention of when to InvalidateTargetTile in the algorithm above.
This implementation detail allows us to support the broader user story:
As a player, I want to move Chomp (the player character) around, so that I understand movement is locked within the game's grid lines.
Thus, any grid alignment algorithm fundamentally needs to determine 2 things:
- whether the player has stepped out of the grid lines, and
- how to correct the player's position, so that we remain on the grid lines.
In my solution, I rely on the notion of a "target" tile: the tile that the player is moving into given their current movement.
This allows us to check when a player has moved past a target tile using a dot product:
// Compute the dot product: the player's location relative to the target tile.
const FVector WorldTarget = LevelInstance->GridToWorld(GridTarget);
const auto MinDiff = MinDifferenceVector(PostMovementLocation, WorldTarget, LevelInstance);
const auto DotProduct = FVector2D::DotProduct(Dir, MinDiff);

// Sanity check. Because of how we do rounding, we are never >= 150 cm away from our target.
check(FMath::Abs(DotProduct) < 150.0);

// Compute whether we moved past the target tile, and by how much.
const auto MovedPastTarget = DotProduct < 0.0;
const auto AmountMovedPast = DotProduct < 0.0 ? FMath::Abs(DotProduct) : 0.0;
This information allows us to lock the player to the target tile's position if there is a wall tile where the player intends to move.
Most importantly, this notion of a "target" tile avoids use of Unreal's collision system, whose collision results may be hard to predict and control.
A finite state machine for game states
Before we move onto discussing ghost AI movement, let's briefly mention how the game's state is defined.
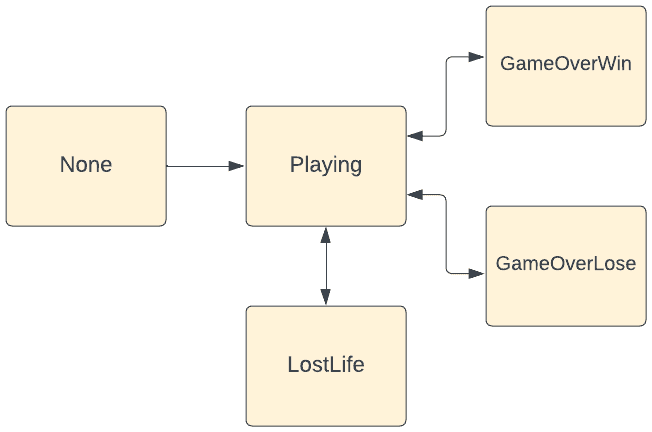
The game's current state is represented by an enum:
UENUM(BlueprintType)
enum class EChompGameStateEnum : uint8
{
    None,
    Playing,
    GameOverWin,
    GameOverLose,
    LostLife,
};
Within the Playing state, EChompPlayingSubstateEnum represents the current wave of AI behavior as a further sub-state:
UENUM(BlueprintType)
enum class EChompPlayingSubstateEnum : uint8
{
    None,
    Scatter,
    Chase,
    Frightened,
};
The AChompGameState exposes getters and setters for fetching and transitioning this game state, as well as delegates to expose hooks for code that runs on state transitions.
The final state machine encodes the diagram below:
Persisting high scores with USaveGame
In addition to the state machine, AChompGameState tracks a number of game variables:
- the score,
- the number of dots consumed,
- the number of lives remaining, and
- variables to track when to spawn bonus fruit.
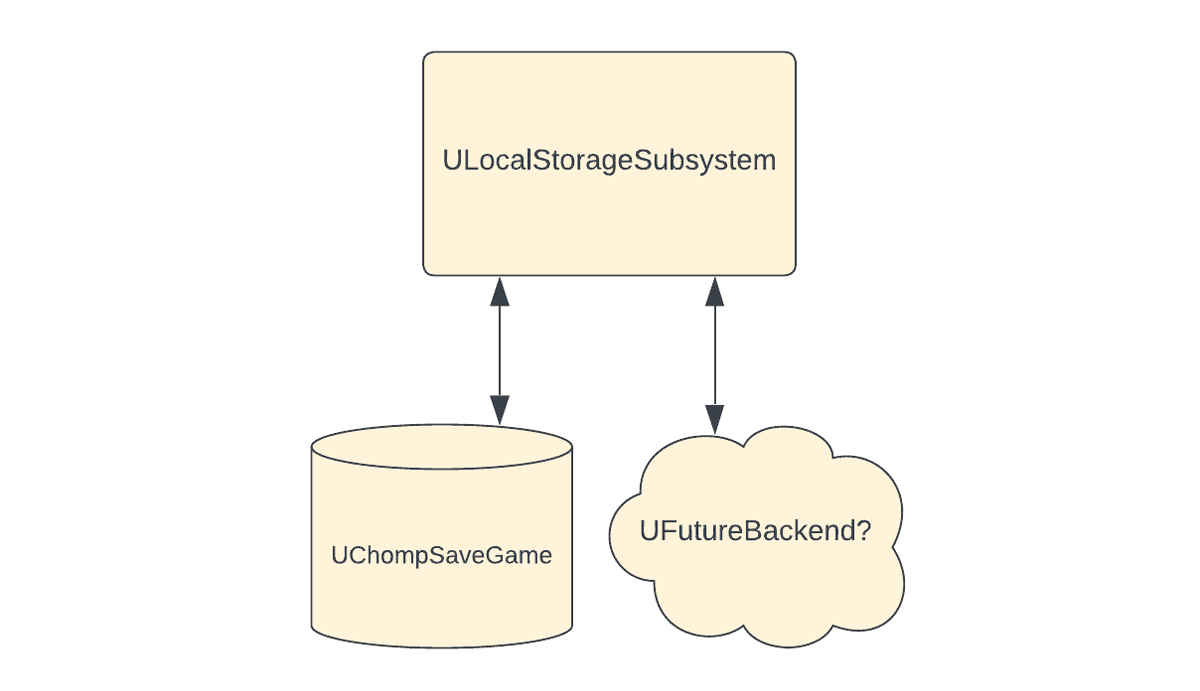
Two, separate classes hold responsibility for persisting high scores: ULocalStorageSubsystem, and UChompSaveGame.
ULocalStorageSubsystem is a UGameInstanceSubsystem, and thus lasts for the entirety of a session of play. I take advantage of this property by loading the UChompSaveGame file at the start of the game, and saving to the UChompSaveGame file upon stopping the game:
Web developers may be familiar with window.localStorage as a mechanism to persist state across browser sessions, and the ULocalStorageSubsystem naming is adapted because of the similar effect in Unreal.
The choice of a ULocalStorageSubsystem creates a handy separation of concerns between in-game data, and data persistence. One could imagine swapping out the UChompSaveGame with a web backend for persistence, while the ULocalStorageSubsystem interface remains the same for the rest of the codebase.
Ghost AI
Class design
The original Pac-Man's AI implementation is dirt simple, and doesn't involve any fancy pathfinding algorithms. A ghosts’ movement direction is simply recomputed at intersections, where the computation is based on the positions of the player and other ghost pawns (see link).
While copying classic Pac-Man's implementation is simplest, I wanted to implement a proper pathfinding algorithm (A*) from scratch as a learning exercise, and also to use the A* implementation as a primitive in building more complex AI later on.
By introducing ghosts that sap the player's lives into the game, we introduce a new user story for the player:
As a player, I want to avoid ghosts that chase me around the maze, so that I can avoid losing a life.
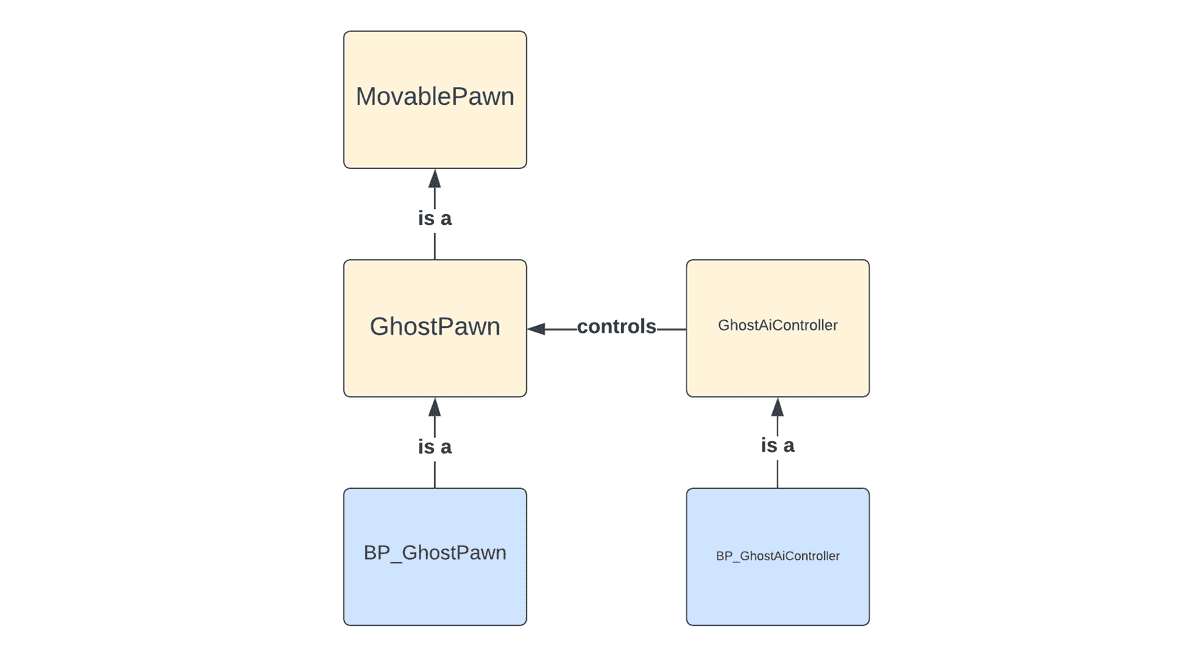
Similar to the class design for the player character Chomp, each ghost is represented by an AGhostPawn controlled by an AGhostAiController:
Algorithm: A* pathfinding
The A* pathfinding algorithm operates on nodes within a graph; it isn't coupled to a 2D grid. Thus, I define an IGraph interface that exposes Cost() and Neighbors() methods:
class IGraph
{
protected:
    ~IGraph() = default;

public:
    virtual std::vector<FGridLocation> Neighbors(FGridLocation Id) const = 0;
    virtual double Cost(FGridLocation FromNode, FGridLocation ToNode) const = 0;
};
The ULevelLoader mentioned in the earlier section on level loading provides my game's implementation of IGraph. Within ULevelLoader, I treat each cell within the grid as a "node" within the pathfinding graph, and compute neighbor nodes based on whether adjacent nodes are wall tiles and within bounds.
The method AStar::Pathfind() then accepts instances of IGraph, and is where I implement the A* pathfinding algorithm.
The A* algorithm itself is well-described (see the authoritative explanation from Red Blob Games), and my implementation doesn't do anything special. I use Manhattan distance (basically, number of city blocks) as the A* algorithm's heuristic function.
Once the A* path is computed, I pass the list of FGridLocation pairs into an FMovementPath, which contains helper methods to MoveAlong() ghosts on the provided path. I use this FMovementPath directly in AGhostAiController's Tick() method.
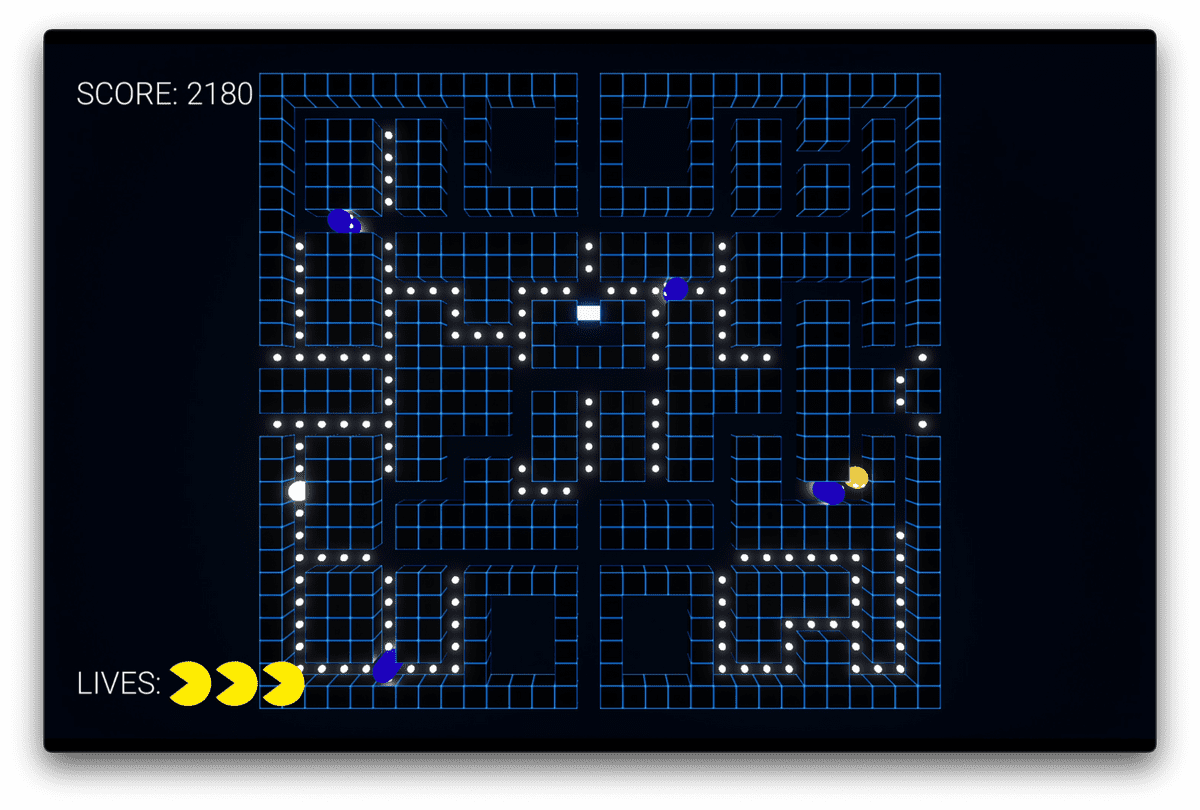
The end result (colored spheres denote A* paths):
Designing AI behavior
In the original Pac-Man, ghosts follow alternating waves of "scattering" to their respective 4 corners, then returning to chasing the player:
| Scatter (7 seconds) | Chase (20 seconds) | Scatter (7 seconds) | Chase (20 seconds) | etc.
For the sake of staying close to the original game design, I implement this wave pattern within FChompPlayingSubstate, which maintains an internal timer to determine the current wave.
Within the Chase behavior, AGhostAiController provides a hook GetChaseEndGridPosition() for customization within C++ (or Blueprint) subclasses.
In my implementation, the red ghost Blinky goes straight for the player. But I override this hook for 3 of the ghosts:
AClydeAiController. Chases directly after the player, but only when outside of an 8-unit radius.APinkyAiController. Chases 4 units in front of the player.AInkyAiController. Chases the doubled vector from Blinky's position to the center of 2 units ahead of the player. It's a little complex, but the overall effect is to give the impression of cornering the player.
To design additional or more nuanced gameplay, both the scatter-chase waves and ghost chase behaviors can be further tweaked and customized.
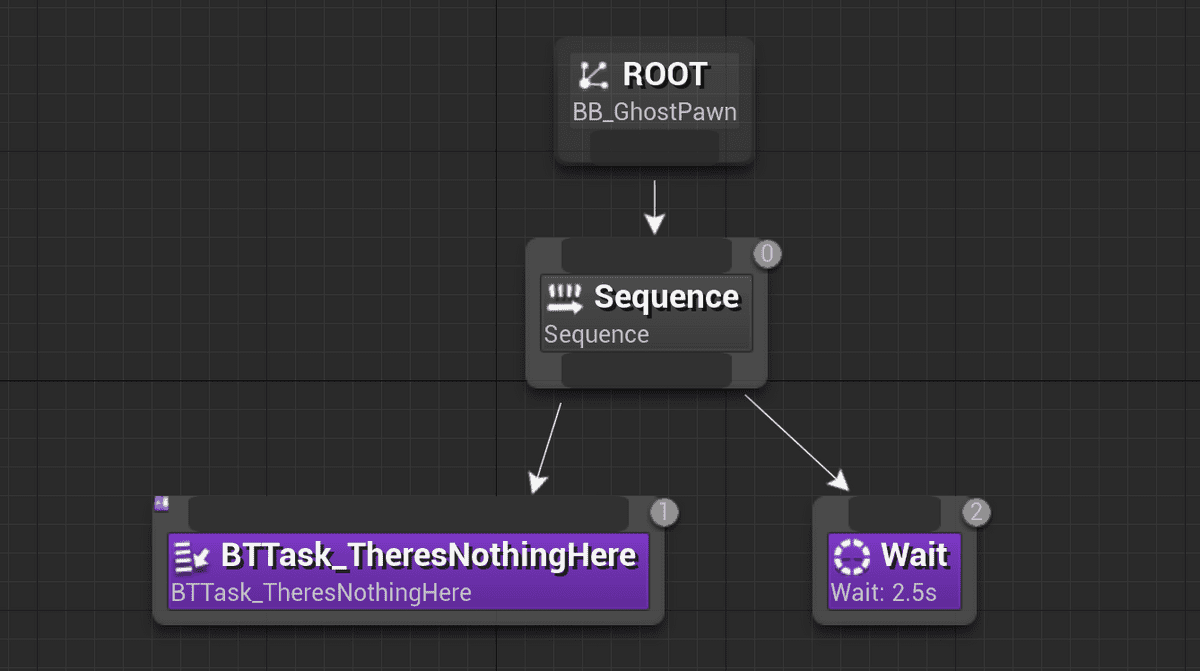
What about behavior trees?
In light of the earlier discussion on exercising as many of Unreal's engine features as possible (see link), you may be curious why this AI implementation omits behavior trees entirely.
Behavior trees are a way to visually compose priority-based behavior. Their primary advantage is their visual construction, which makes it easy to delegate AI authoring from programmers to designers.
While much of my AI implementation is in C++ (not behavior trees), with more time I'd consider refactoring my AI implementation into a behavior tree to benefit future exploration and iteration.
For example, it would make an interesting gameplay twist if the ghosts' AI weren't tied to a global notion of scatter-chase waves, and instead were based on Unreal's EQS (Environment Query System), AI Perception (sight or sound), or stealth elements.
Non-core game mechanics
Beyond the base gameplay of avoiding ghosts that chase the player, I implemented several more game mechanics to bring this Pac-Man adaptation in line with the original game design.
Consumables
Though not explicitly made into a C++ interface, actors that can be "consumed" by Chomp follow the pattern of exposing a Consume() method.
This includes the following objects:
- Dots within the level.
- Energizer dots within the level. This throws the global scatter-chase state machine into a "frightened" state, which causes ghosts to turn blue and become capable of being consumed.
- Instances of
AGhostPawn, when in a frightened state. - Bonus fruit. Like in the original game, a bonus pineapple appears at 70 and 170 dots.
With this general notion of an IConsumable interface, one can imagine designing new consumables to add to the game.
For example, a "bomb" consumable might award the player a bomb, which can be used by the player to destroy wall tiles within the level. Or perhaps consumables that should be avoided because of their negative effects on player attributes.
With more development time, consumables provide a large design space that any designer can freely explore.
Controlling difficulty with GhostHouseQueue
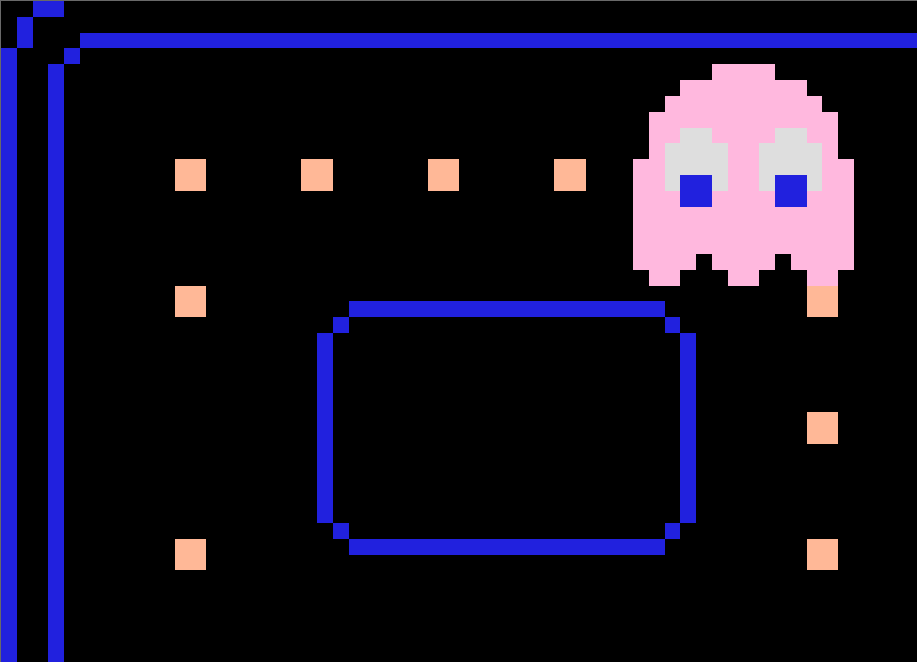
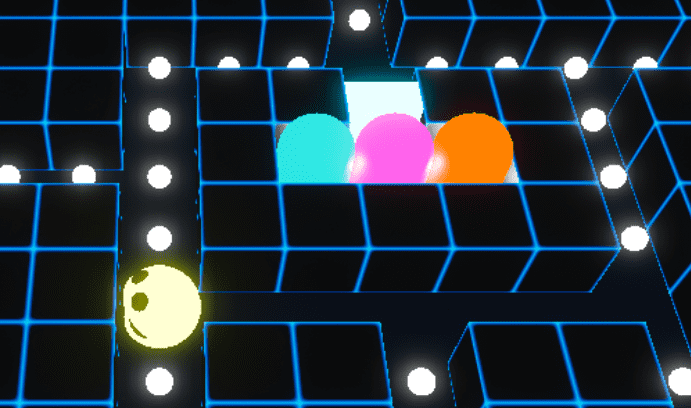
In the original Pac-Man, difficulty is controlled through the ghosthouse at the center of the level:
Ghosts only leave the ghosthouse after a certain number of dots have been collected, or a certain amount of time has passed since the player last collected a dot.
Since ghosts leave the ghosthouse in a particular order (left to right), I thought the notion of a "queue" of ghosts waiting in line would be appropriate:
- First, I created an
ARuntimeSet— an actor that has no visual representation, and that maintains a list of actors that are only populated at runtime — and added it to theGameWithAI.umaplevel. - Second, I created
AGhostHouseQueue, which extendsARuntimeSet, and will remove ghosts from the queue if no dots have been consumed after a set duration of time.
To tune the ghouthouse queue conditions, a designer could extend the AGhostHouseQueue class in Blueprints for further scripting. It's a convenient, single class to handle the ghosthouse responsibility.
Visual iteration in Blueprints
The latter half of the project involved plenty of visual work, where iteration speed became very important. This is where I started to work more extensively in Blueprints and within the Unreal editor.
Game menus
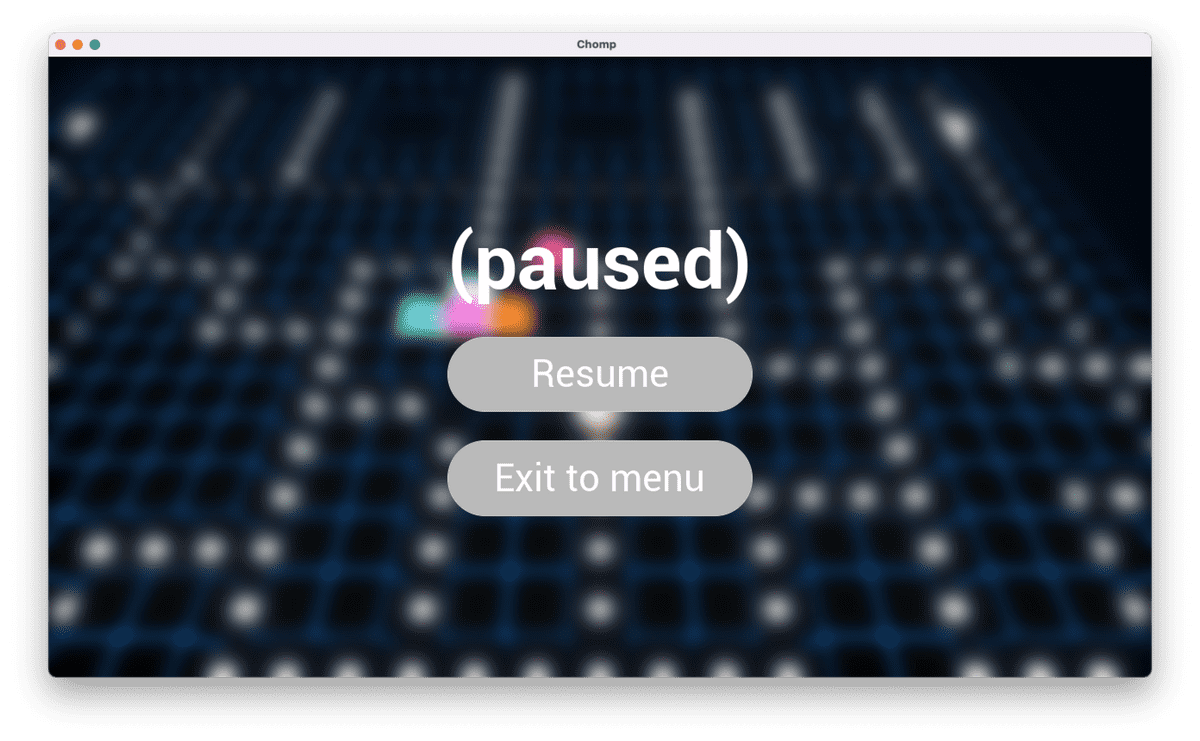
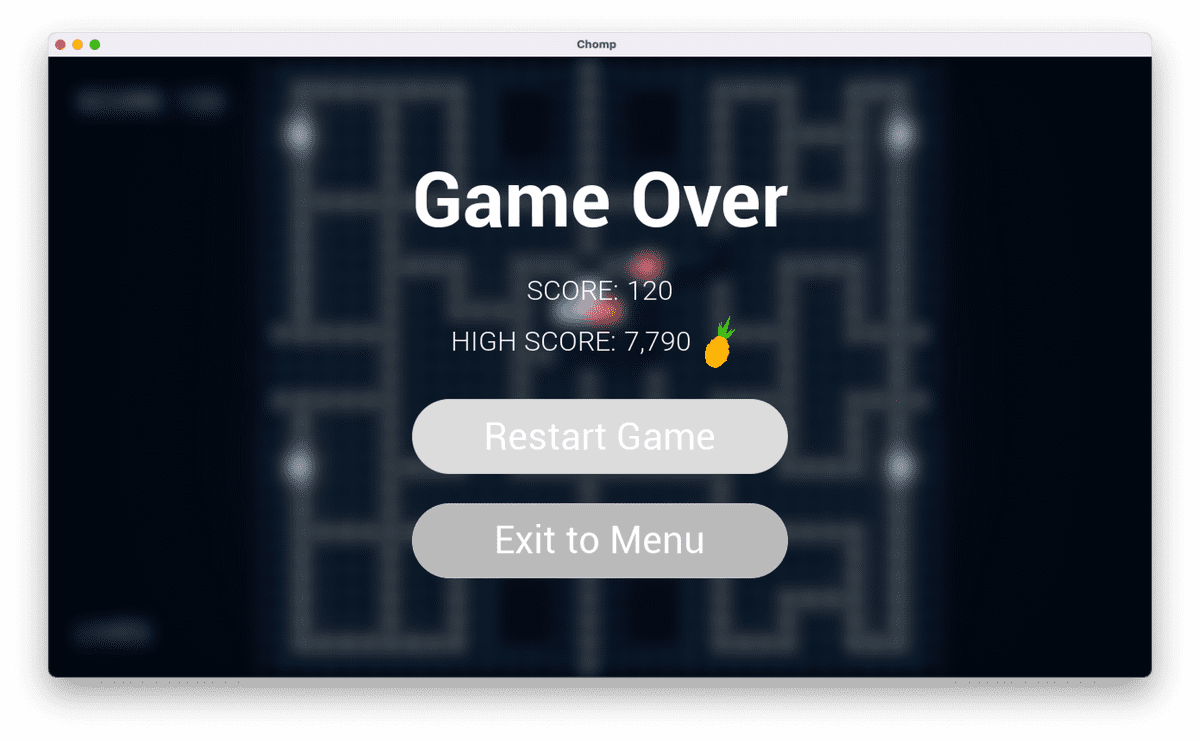
Chomp sports a complete set of game menus, whose logic is primarily implemented in Blueprints:
For details, see my blog post about modular UI in Unreal, which outlines this project's technical approach to UI.
Discussion
Because game menus (in particular, options menus) are similar across all games, I'd consider extracting the Widget Blueprints in this project into an Unreal plugin for future reuse.
A reusable plugin would save time on UI boilerplate in the future, and that saved time can be allocated toward customizing the UI's look and feel via UI Materials.
Game juice
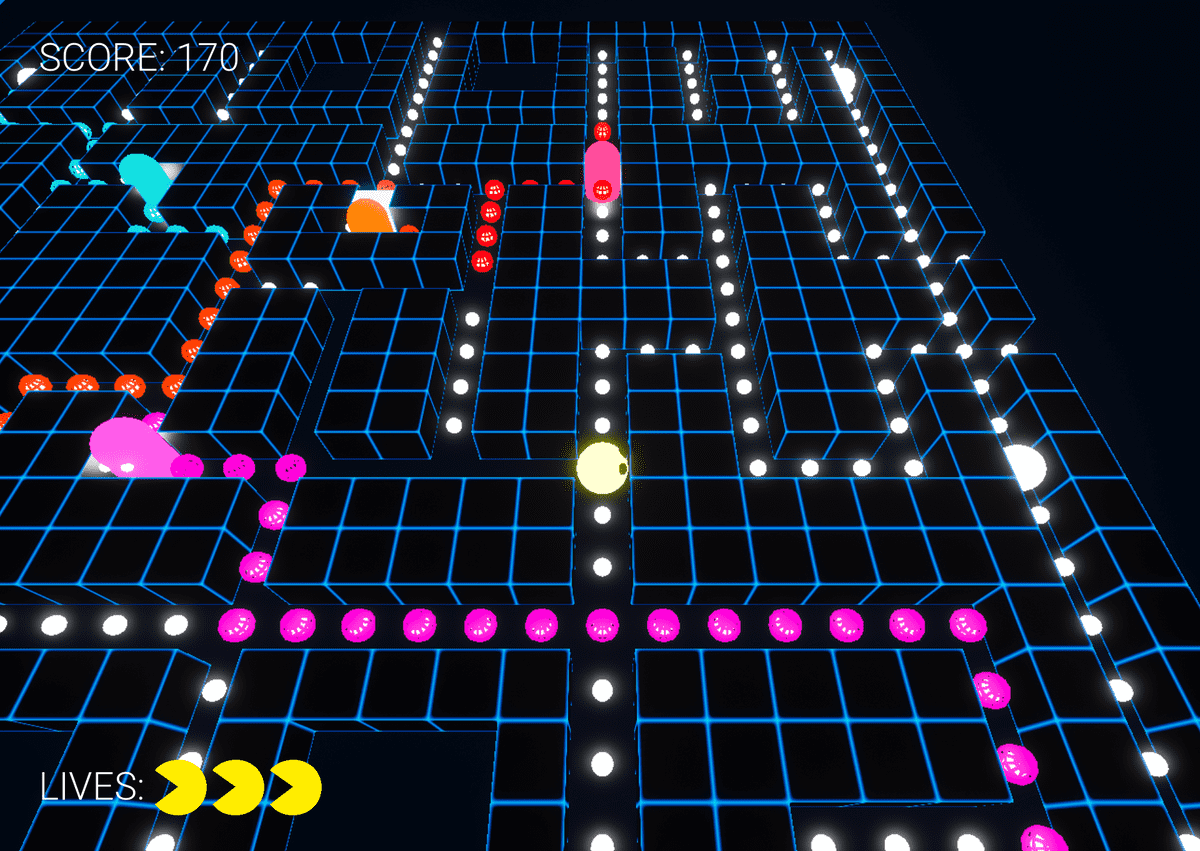
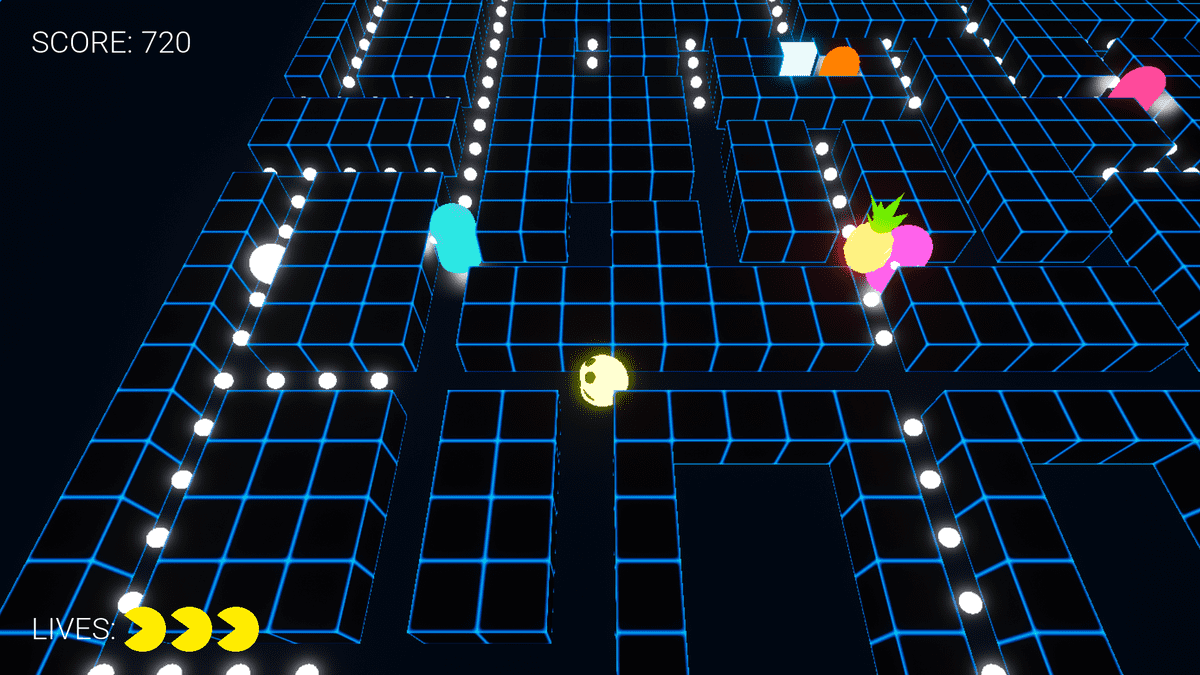
Re-creating a pixel perfect version of classic Pac-Man would be boring. We're in a full-blown 3D engine, and thus we can use all of Unreal's tools to give the game a modern, 3D flair.
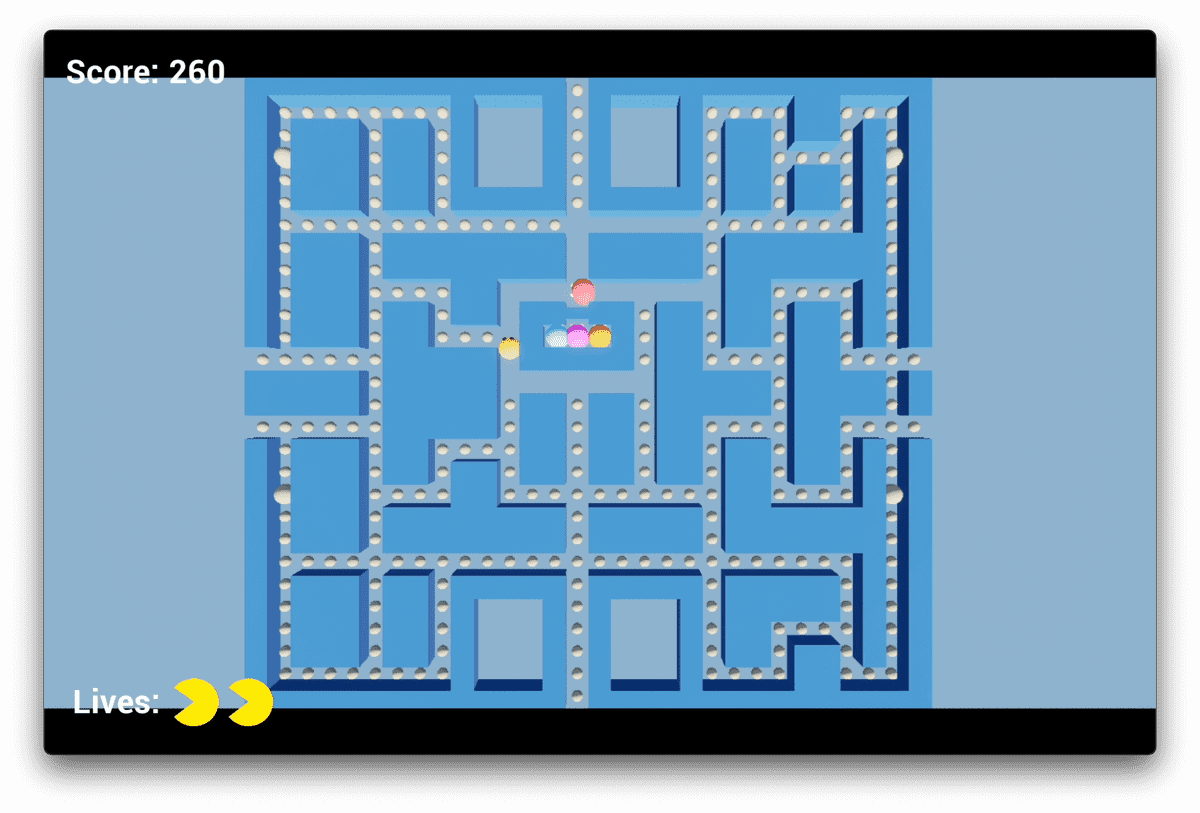
Compare what the game looked like before:
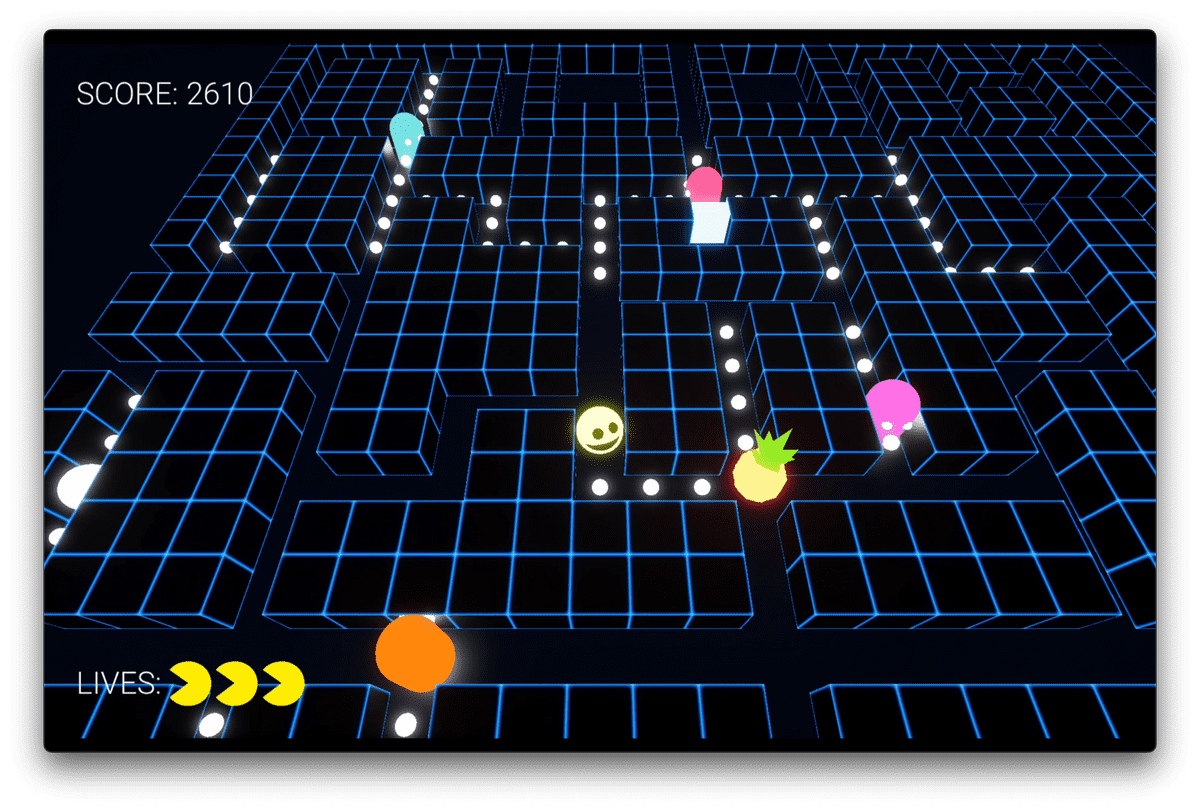
To what the game looked like after:
Thus, I opted to add a few, simple changes that led to a big impact on the game's look and feel:
- A dark, near-black background. The default sky blue background has to go.
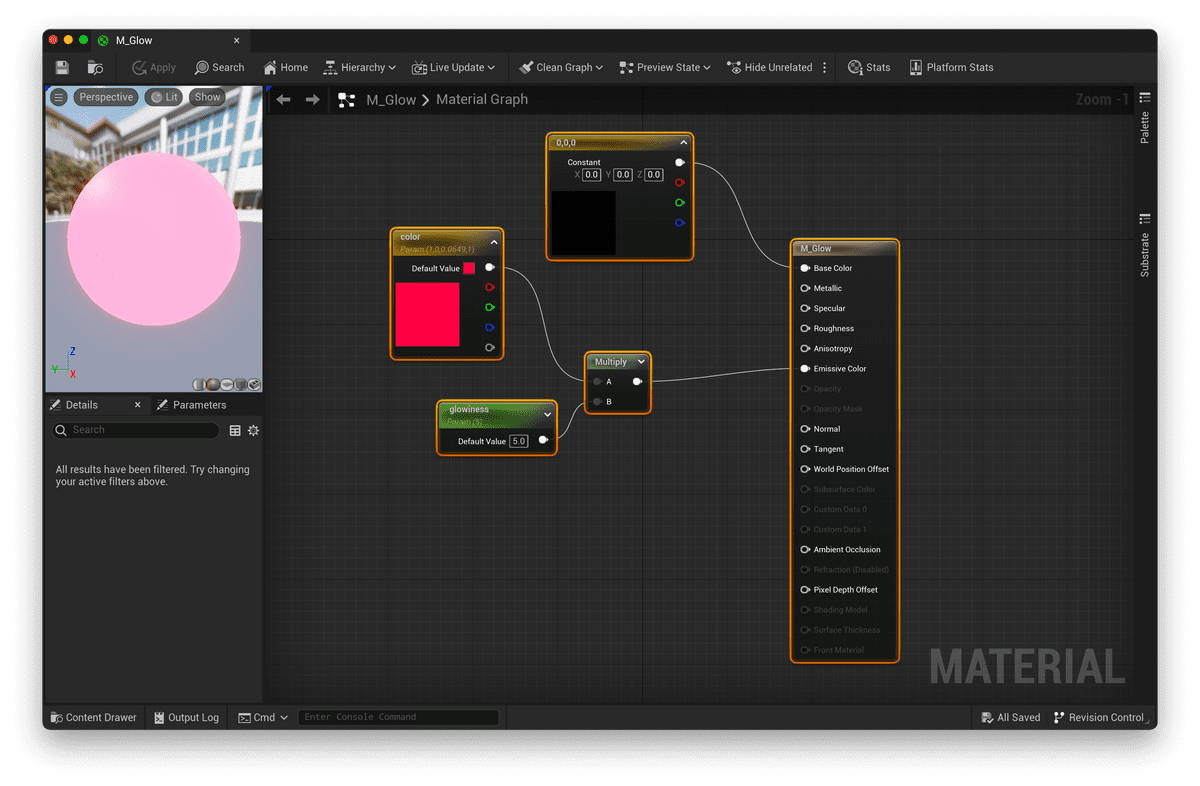
- Emissive materials. Objects should glow to stand out in the inky darkness:
- The titular "chomp" animation. The player will stare at Chomp for the entirety of the game, so I wanted to dress up the player model. I did some simple Blender modeling of an array of teeth (using Blender's Circle modifier), and animated the model with a Timeline node in Blueprints:
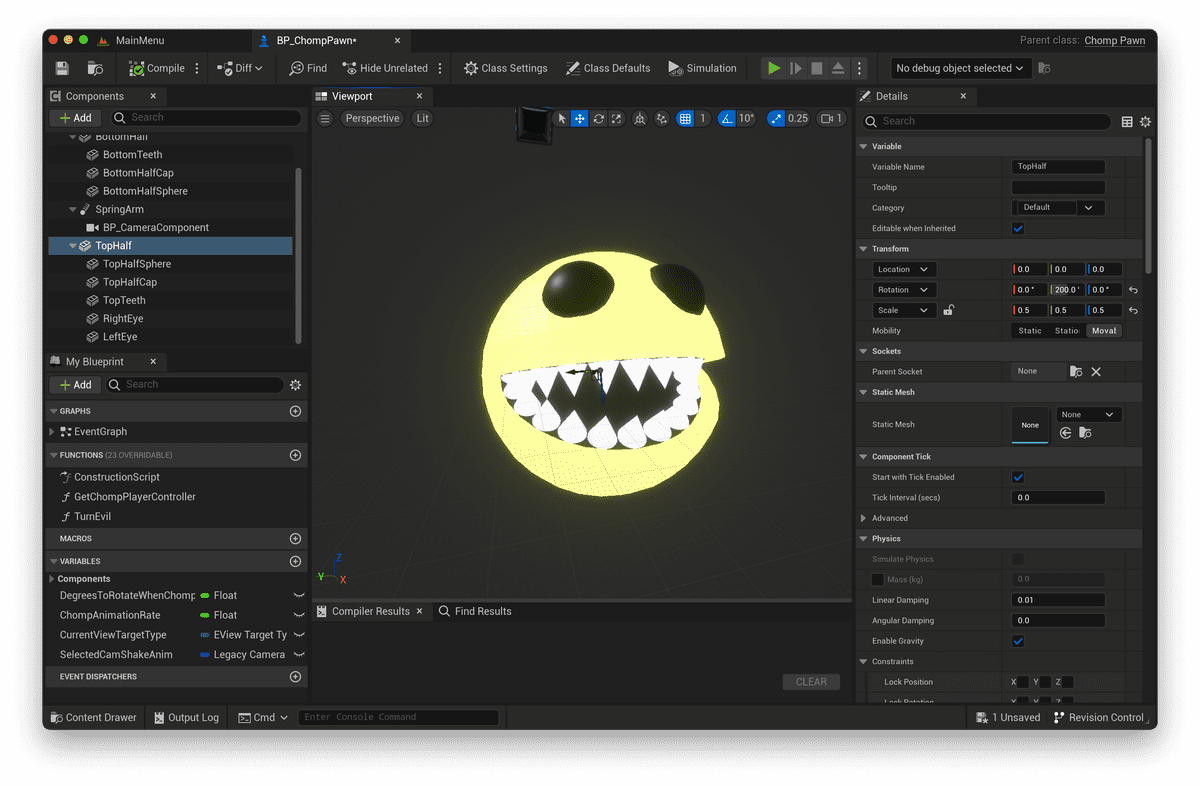
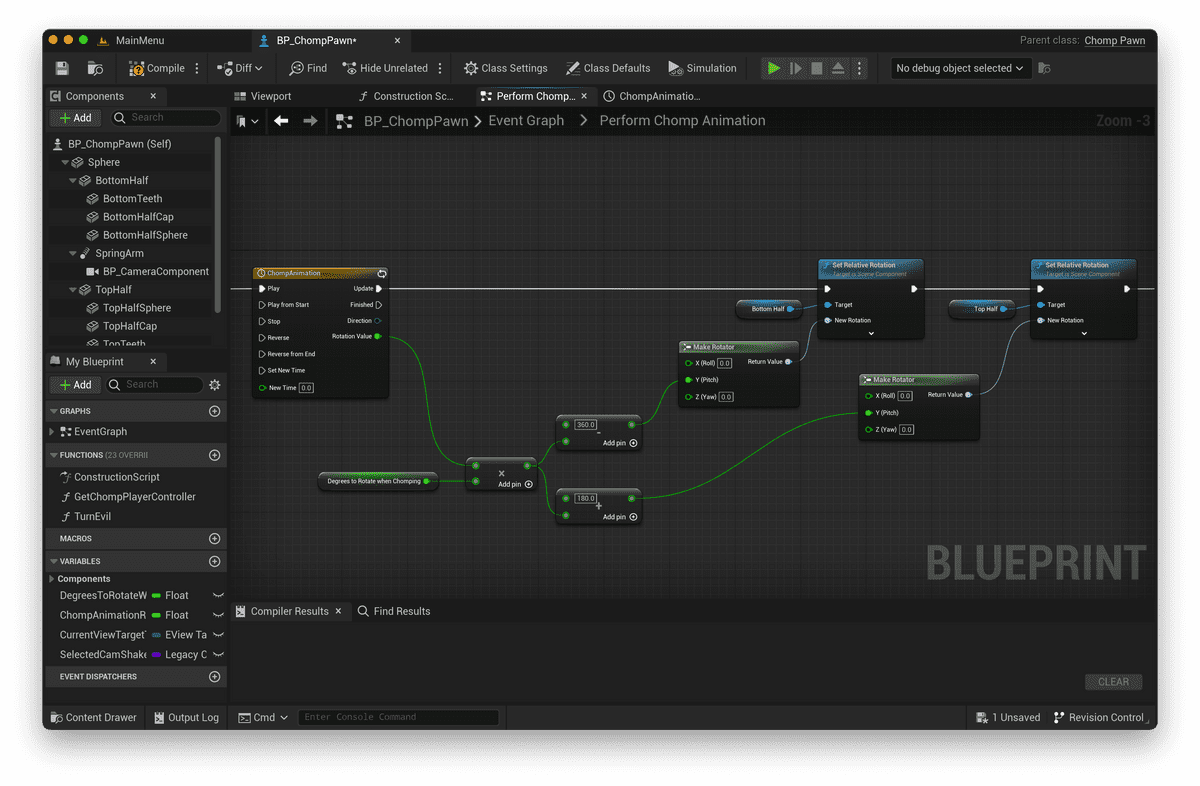
- A dynamic camera that blends between 3 view targets. One a default distance from the player, one close up to the player when the player is energized, and one that oversees the entire maze structure.
- Camera screenshake. To visually accentuate the feeling of consuming objects in a gruesome way.
With more time, I'd add sounds and particle effects as the remaining pieces of game juice that give a high bang-for-buck. I'd also playtest the game with other players to see if the game fails to communicate the right feedback.
From a technical standpoint, the separation between C++ and Blueprint classes creates a clear division of labor between programmers and designers of game feel.
A workflow might involve 2 developers working in tandem: a programmer would expose delegates such as OnPlayerWallCollide or OnPlayerChomp, and a game feel designer would script handlers for those events in Blueprints.
I'd also explore Gameplay Cues from Unreal's Gameplay Ability System (GAS) as a more robust method of handling player feedback — especially in a networked environment.
Staying agile via a development pipeline
Even on a 1-man project such as this one, I found it was important to instate a lightweight QA process.
Doing so meant that new features were added onto stable foundations. It also provided feedback so that I didn't break existing features, and lose time to fixing bugs afterward.
To formalize this process (or pipeline), I created a simple GitHub pull request checklist. All features would be done on feature branches in git, and work would not be considered done until a pull request was opened — with all tasks on the checklist checked off:
Creating this development pipeline had several benefits:
1. Continuous improvement, and getting faster as an Unreal developer
Storing the checklist in version control had the nice effect of codifying my process, which allowed me to iteratively improve the process over time.
Breaking the development process down at a granular level also made me aware of the steps that I spent the most time on.
Am I running into trouble reaching the first draft of a feature? Perhaps it was because I had to learn a new piece of tech within Unreal.
Am I running into lots of bugs in C++? Perhaps that's an opportunity to review some foundational C++ knowledge, or learn more about debugging capabilities within Rider (my Unreal IDE of choice).
Am I spending too much time waiting for the game to build? Perhaps that's an opportunity to invest in build automation. (Though I didn't run into this time bottleneck on this project.)
2. Constantly shippable game builds
It also kept my game in a constantly shippable state at the end of every new feature. I could work on my game in shippable increments, and call an end to the project at any time.
3. Task estimation
On a larger team — or on a project with firm deadlines — knowing your past performance on subtasks makes it far easier to predict how long future subtasks will take.
For examples of this development pipeline in action, see the full list of pull requests on GitHub.Conclusion, and takeaways
To recap, we defined 4 pillars at the outset of the project:
- Engine breadth. Focus on learning all the major parts of Unreal's gameplay toolset.
- Focus on production, not design. Focus on implementation over game design.
- Get it right, then make it fast. Focus on learning skills well before attempting to perform that skill with speed.
- 3 months. Keep a time constraint in order to prioritize.
We walked through the technical implementation of a Pac-Man-inspired game in Unreal. We discussed how each feature was implemented within Unreal's Gameplay Framework, and in doing so we covered the strengths and weakness of choosing C++ versus Blueprints for particular tasks.
Most importantly, we kept the game constantly shippable from the outset with a development pipeline. This allows us to easily extend the game in the future:
- Game juice. We could add even more game juice to make the game more appealing on social media.
- We could convert the game into a roguelike. By revisiting the handling of lives, or adding more elaborate maze formats.
- Difficulty tuning. We could script more elaborate ghost AI in behavior trees.
- Bomb consumables. We could add a "wall bomb" mechanic that allows players to pick up bomb consumables, and bomb or destroy wall tiles.
One is only limited by their imagination.
For future game projects
In future game projects, I'd consider experimenting with multiplayer programming, which requires further thought and care around game state replication. I'd also consider using Unreal's Gameplay Ability System (GAS), to evaluate how the framework benefits games with a large number of networked game mechanics.
Much love to the people in the NYC Accountabilibuddies game dev Discord server for providing moral support throughout this project's development. I couldn't have done it without them.
